Posts

Showing posts from 2023

how to send auto message on skype using python on one click

Image
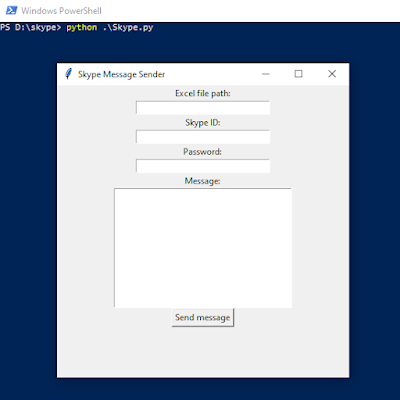
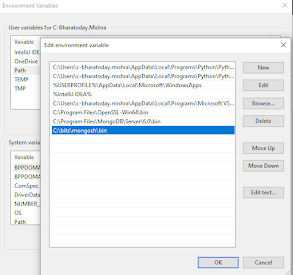
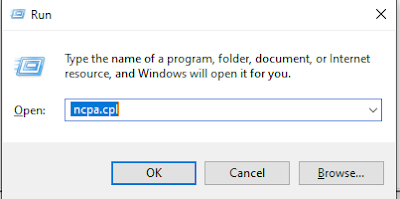
 Guys, as requested by my subscribers, I tried to share some basic Python code for sending a Skype auto-message with a single click. Before running the Python script, you have to install Python and some basic libraries. Hope you know the basics of Python programming.  Apart from this, we are introducing the step that how you Convert the same Python Script to .exe File and share the same with your SALE person so that He/She can easily send the bulk message to the clients instead of one to one. Step 1. Install the python  Step 2. # # Install the required libraries using CMD or window power shell         pip install skpy        pip install -U -q pandas Step 3. Execute the below Python code. #!/usr/bin/env python # coding: utf-8 import pandas as pd import getpass import tkinter as tk from skpy import Skype, SkypeChats # Create a tkinter GUI window window = tk.Tk() window.title("Skype Message Sender") window.geometry("400x400") # Define a function to send the messag

'mongo' is not recognized as an internal or external command, operable program or batch file version 6 +

Image
First, you have to check the version. Two cases will happen: either you have to set up the binary path with the environment variable or check which command is suitable for your version. If you use the  mongo --version of this command and you got the below error  " mongo' is not recognized as an internal or external command, operable program or batch file "   immediately check your environment path whether you have set it up or not till the bin path for your MongoDB software. like the below screenshot.  If your path has been set up accordingly then check other ways to find the version  e.g  mongod --version C:\>mongod --version db version v6.0.4 Build Info: {     "version": "6.0.4",     "gitVersion": "44ff59461c1353638a71e710f385a566bcd2f547",     "modules": [],     "allocator": "tcmalloc",     "environment": {         "distmod": "windows",         "distarch&qu

How to Edit Your Hosts File in Windows 10

 Here are the steps for editing your hosts file: Click the Windows button and type Notepad in the search bar. Run as Administrator by selecting Notepad with the right click mouse . You’ll be asked, “Do you want to allow this app to make changes to your device?”. Choose Yes. In Notepad, choose File then Open. Navigate to C:\Windows\System32\drivers\etc\ open host file in nodepade and edit e.g [IP address space hostname] xx.xx.xx.xxx myhostname Finally, you will want to flush your DNS cache for your computer to recognize changes to the file. Click the Windows button and search command prompt Type the following command in the terminal and press Enter           PS D:\> ipconfig /flushdns Windows IP Configuration Successfully flushed the DNS Resolver Cache.

Sanity Testing | Software Testing

Regression testing has a subset called sanity testing. Sanity testing is carried out to verify that the code changes are functioning as intended. In order to determine whether testing for the build can continue or not, sanity testing is a pause. While conducting sanity testing, the team's main objective is to confirm that the application is functional rather than conducting in-depth analysis.  Sanity testing is typically done on builds when an immediate production deployment, such as a critical bug fix, is necessary. The goal is to show that the software's developer was rational (and sane) in how they created it, not to thoroughly test the new functionality. Suppose, for instance, that your scientific calculator output is 2 + 2 = 5. Tests of more complex features, such as sin30 + cos 45, are rendered useless.

To access this repository, an admin must whitelist your IP. fatal: Could not read from remote repository

Image
 Hi Reader , To access this repository, an admin must whitelist your IP.fatal: Could not read from remote repository, a certain error may occur when your system uses IPv6 to communicate. I believe the steps below will solve the aforementioned issue. Press window+ R and Type ncpa.cpl and press Ok button  Go to your Wifi and right click on it then click the Properties  Now check your internal protocol version 6 and you have to uncheck it as depict on the above screen . Restart your PC and take pleasure in your work. :)